Chapter 1
Page 11, paragraph 2:If, for example, you have the Omondo UML plug-in installed and double-click a UCD file, the Omondo UML Class Diagram Editor will open (see Figure 1.2).
Page 12, paragraph 2:
Unchecking the menu item Fast View will put the view back from where you dragged it. However, instead of unchecking Fast View from the pop-up menu, click anywhere else on the Workbench to force the view to close.
Page 13, paragraph 2, the last sentance:
You will find a much more in-depth discussion about natures and how to assign one to a project in Chapter 14, "Writing a Trivial (and Not So Trivial) Plug-In," when you walk through the creation of a new project type.
Page 14, paragraph. 1, sentence 2:
Because they all have their strengths, let's examine each one in turn. They all share many of the same views, so we will discuss certain views only once, and you can safely assume that the view is valid at least in the perspective where it is discussed.
Page 15, paragraph 2:
If the Hierarchy view obscures your view of the Package Explorer, click the Package Explorer tab located at the top of the view.
Page 16, paragraph 3:
A project contains packages, not directories with subdirectories that constitute a Java package which is how the Navigator view displays its files.
Page 21, paragraph 5:
Workbench, Editors, Text Editor-These preferences can be used by all the text editors. My Text Editor preferences are set to a Print Margin Column of 80, and Show Overview Ruler, Show Line Numbers, Highlight Current Line, Show Print Margin are all set.
Page 21, paragraph 6:
Workbench, Appearance-Eclipse defaults to displaying editor tabs on the top of the editor and view tabs at the top of the views. You can change the position of the tabs to the top or bottom of the editors and views from this page. Also, the perspective, which is displayed in a tab to the top right, can be displayed over at the top right or in a shortcut bar to the left. The changes take effect as soon as you click Apply.
Page 21, paragraph 7:
Clicking Add Variable displays the New Variable Classpath Entry dialog. The entries in this dialog all come from the Preferences dialog's Java, Build Path, Classpath Variables page.
Page 21, paragraph 8:
Java, Build Path-A new project uses the project directory as its default. The standard location for plain Java files (that is, non-servlet, non-JSP, non-EJB, and so on) is the src directory, with class files being written to the classes directory. The New Build Path page lets you change the default and, in addition, select the directories where source and class files go.
Page 22, paragraph 1:
Java, Code Style-The preferences found here and in the Code Formatter, Code Templates, and Organize Imports subnodes are going to be the ones that have the greatest impact on your code if you use the wizards to generate stub code based on Quick Fix hints. The Code Style page is where you set any prefixes and suffixes used in your code so that the Generate Getters and Setters pop-up menu item will generate method names that ignore those parts of the field name. For example, if you've used leading underscores to identify instance fields, you would use the Code Style page to add an underscore in the Fields Prefix List cell (see Figure 1.15). Select the row of Variable Type Fields and click Edit. The Field Name Conventions dialog will open, allowing you to enter a comma-separated list of prefixes and suffixes that should be ignored when the wizards are using the field names to generate code. Enter into the Prefix List field _, m_, f_ and into the Suffix List field enter _, _field. Click OK and you will see your new field tags listed in the table. Click OK again and open up a Java file (if you don't have one, then create a project and create a new class or import one).
Page 23 paragraph 1:
Java, Code Style, Code Formatter-The code-formatting options of the Java editor can all be found here. The Code Formatter page displays a window displaying how Java code would appear with the current format settings. You can create a new formatting profile or create a copy of an existing profile and modify it to suit your team's standards. You can create a new profile by clicking New or you can change a modifyable profile by clicking Show. If you click Show the Show Profile dialog will open with eight tabs that dictate what the editor will do about new lines, the length of lines, how comments are formatted, and so on. The combinations are many and varied.
Page 24, paragraph 4:
Java, Editor-The Editor page is where you set line numbers, print margins, syntax colors, spaces for tabs, and so on. In the Appearance tab, set Show Line Numbers and Show Print Margin. In the Typing tab set Insert Spaces for Tab and if you don't like the editor giving you matching quotes, braces, and parentheses, then turn them off as well. In Java, Editor, Code Assist you might want to set Fill Argument Names on Method Completion.
Page 26, paragraph 4:
In the Shortcuts tab, the New entry under Submenus displays two selected shortcut categories and five selected shortcuts.
Chapter 2
Page 30, paragraph 1:Before you create your first project, you should open the Preferences dialog to the Java, Build Path page.
Page 30, paragraph 3:
Resources in Eclipse are projects, folders, and files. To create a project, you can select a shortcut in the main menu (File, Project or File, Other), the toolbar (the first button from the left has a short list of resources that can be created, including Other), by right-clicking in the Package Explorer and selecting from the pop-up menu New, Proejct or New, Other, or by pressing Ctrl+N from the keyboard.
Page 32, paragraph 1:
It overlays the Package Explorer, so click the Package Explorer tab, located at the top of the leftmost views, to bring the Package Explorer view to the top.
Page 35, paragraph 6:
If you wait a second or two, a tooltip will appear, notifying you that the problem it encountered was "calculator cannot be resolved."
Page 35, paragraph 6:
The choices cover the most obvious solutions: define a local variable, define an incoming parameter, define an instance field, or simply remove the assignment.
Submitted by Scott Stanlick (10/28/2004):
Page 36, Figure 2.7:
Page 38, paragraph 1:
If the JUnit test does not appear as the top view to the left of the editor, click its tab, which is located toward the top of the Package Explorer view (see Figure 2.10).
Page 39, paragraph 3:
Enter "Writeable Format" for Profile Name and "Java Conventions" for Initialize Settings with the Following Profile (see Figure 2.11).
Submitted by Chris Cha (10/17/2004):
Page 42, paragraph 2:
When the New dialog appears, select Java, Java Run/Debug, Scrapbook Page.
Page 42, first code block, line 3:
System.out.println("Date: " + format.format(d));
Page 43, paragraph 3:
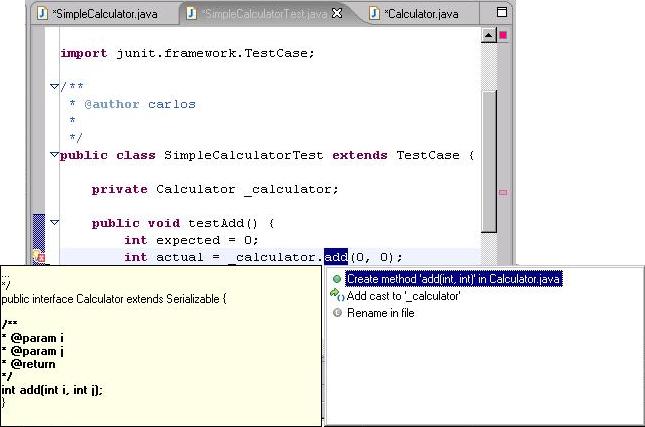
Notice in the editor, displaying SimpleCalculator, has multiple arrows pointing at each individual line.
Page 44, paragraph 1:
...time, only four items appear: Calculator.java, SimpleCalculator.java, SimpleCalculatorTest.java, and .project (see Figure 2.16). Double-click SimpleCalculatorTest.java in the Search view and it will open, displaying arrows pointing at the three lines where the case-sensitive word Calculator appears.
Page 49, image 2.26:
Page 54, paragraph 4:
Use Ctrl+Shift+O to fill in any missing imports:
Chapter 3
Page 58, paragraph 3:Let's look at the Debug perspective and then look at debugging standalone Java code, and server-side Java code as well as remote debugging.
Page 59, the caption for Figure 3.2:
The Variables view displaying the object under test and any local variables within the scope of the currently selected thread.
Page 62, first code block:
return i + j;
Page 69, side bar:
If you are using the standard Javasoft-supplied JVM, here is a caveat on the preceding command-line listing: The -X command-line option for the JVM defines options that may go away someday. The options used above have been around for a few years, but there are no guarantees they will stay that way. Always refer to your vendor documentation to discover what options are available to turn on remote debugging.
Chapter 4
Page 75, paragraph 2:The high-risk point in renaming is not resources such as projects or packages, but within the class definition itself, it's methods and variables, including static, instance, and local items.
Page 76, paragraph 1:
When you select a method name and right-click the selected name, for example, Eclipse opens a Rename dialog that will update the method and, if you decide, any references to the method. If you have dependencies to your class and its methods, using Refactor, Rename is the best way to do a method rename.
Page 80, paragraph 4:
When the Extract Interface dialog opens, enter Shape as the Interface Name and check draw(Graphics) from the list of available methods (see Figure 4.7).
Chapter 5
Page 93, last paragraph:If you updated your Java Preferences (Window, Preferences, Java, Build Path), there should be a src directory under the project node.
Page 93, last paragraph:
If you prefer, delete the project, change Preferences, Java, Build Path to use src and classes, and re-create the project.
Page 94, paragraph 1:
With the src folder selected under your project (or with the project itself selected if you don't have a src directory), press Ctrl+N to open the New dialog. Open the Java node and select Swing. Under Swing select JFrame Visual Class (see Figure 5.3) and click Next.
Page 96, last paragraph:
Select Run, Run again, select Java Bean, HelloSwing, and then check Pack.
Page 97, paragraph 2:
HelloSwing would be started with its default size being the value set in the VE, and it would appear as shown in Figure 5.6.
Chapter 6
Page 128, paragraph 2:Please do not take inclusion in this list as an endorsement as to the usefulness of these frameworks.
Page 132, Figure 6.15:
Page 131, bullet 7:
Bullet 7 is now incorrect as support for a built-in Tomcat launch configuration has been removed. It was originally part of the Eclipse examples, but it was removed prior to the final Eclipse 3.0 release. There is no way to fix it as of now. All I can recommend is to use a plug-in like the Sysdeo plug-in which can be found at http://www.sysdeo.com/eclipse/tomcatPlugin.html.
Chapter 7
Page 144, paragraph 2:The CVS perspective, also called the CVS Repository Exploring, is displayed by either going to the main menu and selecting Window, Open Perspective, Other or by clicking the Open Perspective button in the shortcut bar at the top right of the workbench and selecting Other.
Page 145, paragraph 1:
At the time of this writing, JBoss was the tenth most active project on the site.
Page 148, Figure 7.5:
Page 148-9, paragraph 3:
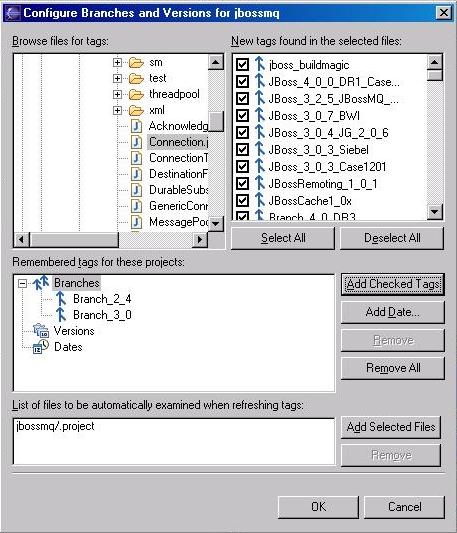
However, if you right-click the jbossmq folder, you'll see the pop-up menu item Check Out (the second item in the list). If you select Check Out, the CVS plug-in will extract all the code in the folder and create an Eclipse project named jbossmq made up of the code from the particular branch of JBoss.org you selected, which in this case is not the latest branch.
Page 150, paragraph 4:
The Share Project dialog will appear, asking you to choose a repository type in which the shared code should reside.
Page 151, paragraph 3:
Click Yes and enter a comment, such as "My first CVS commit." And click OK. Select the CVS perspective and open the repository location you selected as the destination for your code.
Page 154, paragraph 6:
Had the project already existed and you chose Check Out, the CVS plug-in would have prompted you for permission to delete the destination project so that the code checkout could proceed.
Page 155, paragraph 5:
Branch Greeter_1_0 is where your code will go when you update and commit it to the repository.
Page 158, bullet 1:
The check-out process involves finding a module or folder in the CVS repository and selecting Check Out.